Setting Up eBay and Shopify Sync in Part Manager Pro

You sell on eBay, or Shopify, or both — and right now you're updating quantities by hand. Every sale means logging into another dashboard, adjusting another number, and hoping nothing sold twice while you were in transit. PMP connects directly to your marketplace accounts so that orders flow in and quantities flow out — automatically.
Here's how to set it up. The whole process takes about ten minutes per marketplace.
What PMP Does (and Doesn't Do) with Your Marketplace
Before we walk through setup, it's worth being clear about what "sync" means in PMP.
PMP does:
- Import your active listings so you can see them inside PMP
- Pull in orders automatically as buyers purchase
- Push updated quantities back to your listings when stock changes
- Match listings to your internal inventory by SKU
PMP does not:
- Create, edit, or optimize your listings — that's still your listing tool
- Set prices on your behalf
- Manage listing descriptions, photos, or categories
Think of PMP as the inventory brain behind your marketplace storefront. Your listings stay where they are. PMP just makes sure the numbers are right.
Connecting Your eBay Account
Step 1: Add Your eBay Seller ID
From the eBay section in PMP, click Add Connection and enter your eBay seller user ID — the username buyers see on your listings. PMP creates a connection record tied to your account.
Step 2: Authorize PMP to Access Your eBay Data
eBay uses two separate channels for different types of data, so you'll see two authorization buttons:
- REST (Orders) — This connects PMP to eBay's order fulfillment system. It's how new purchases arrive in PMP.
- Trading (Listings) — This connects PMP to your active listings. It's how PMP reads your catalog and pushes quantity updates.
For each one, you'll click the connect button, log into eBay, and grant PMP permission. You'll be redirected back to PMP automatically — no codes to copy, no tokens to paste. The page updates to show your connection status as each lane completes.
Step 3: Run Your First Listings Sync
Once both channels are connected, head to the eBay Dashboard and click Sync Listings. PMP pulls in your active eBay listings — titles, SKUs, quantities, prices, and item IDs. This creates a mirror of your eBay catalog inside PMP.
This mirror is read-only on PMP's side. It reflects what's on eBay right now so PMP knows what you're selling and can match listings to your internal inventory.
Step 4: Run Your First Orders Sync
Still on the dashboard, select a lookback window — 30, 60, or 90 days — and click Sync Orders. PMP pulls in your recent eBay orders: buyer info, order totals, line items, and status.
This first sync is a one-time catch-up. After that, PMP tracks its place with a bookmark and only pulls in what's new since the last sync. You don't need to pick a window again.
Step 5: You're Connected

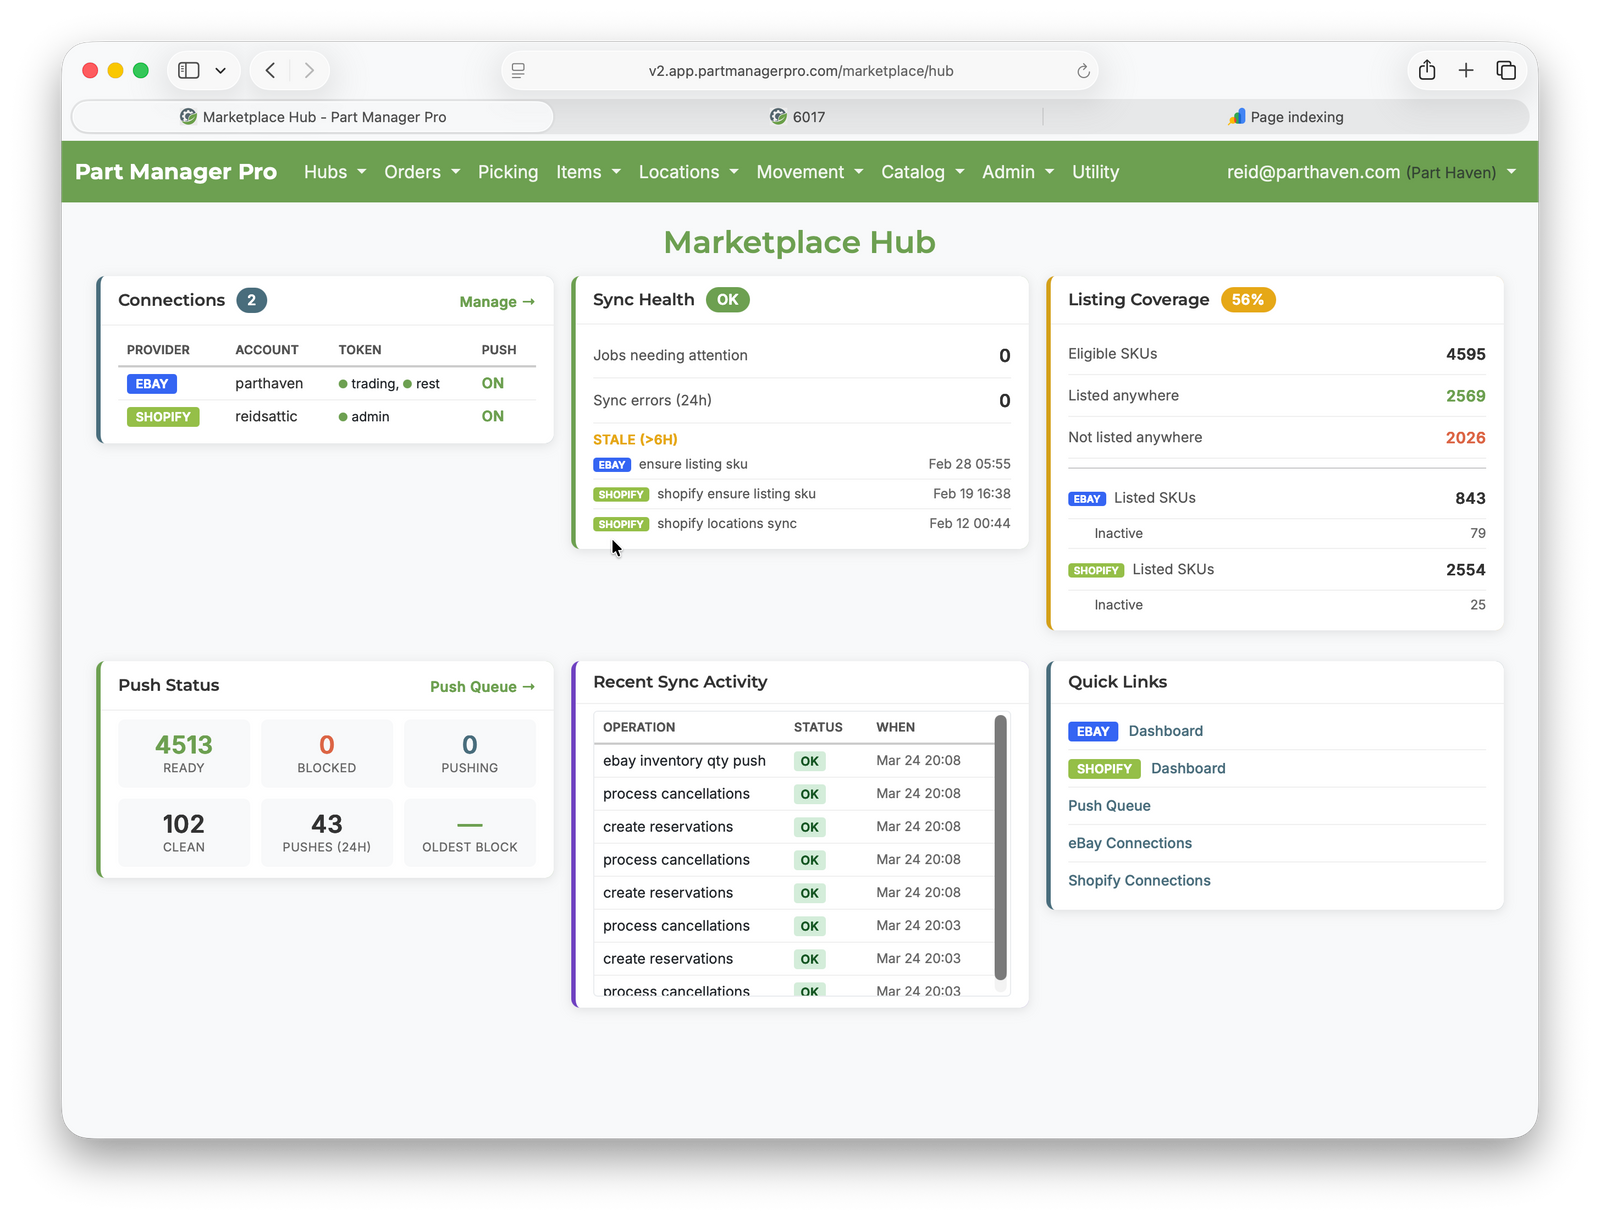
That's it for eBay. Your connection page now shows:
- Connection status for both channels (connected, with expiration dates)
- A Sync Listings button you can run anytime
- An Auto-Push toggle — when enabled, PMP automatically pushes quantity updates to eBay whenever your internal stock changes
- The four-step inventory push workflow for your first manual push
See this in action → Walk through the full product on the overview page
Connecting Your Shopify Store
If you sell on Shopify instead of — or alongside — eBay, the setup is just as straightforward. The steps are slightly different because Shopify organizes inventory around warehouse locations.
Step 1: Enter Your Store Domain
From the Shopify section, click Add Connection and type your Shopify store handle (the your-store.myshopify.com part). PMP creates a connection record for your store.
Step 2: Authorize PMP
Click Connect to Shopify. You'll be taken to Shopify's consent screen where you grant PMP access to your store data. One authorization covers everything — orders, products, inventory levels, and locations.
Step 3: Sync Your Locations
Shopify ties inventory to specific warehouse locations. Before PMP can sync quantities, it needs to know where your stock lives. Click Sync Locations on the Shopify Dashboard. PMP pulls in every warehouse location configured in your Shopify admin.
Step 4: Set Your Push Location
From the dropdown, select the location where PMP should push inventory quantities. This is usually your primary warehouse — the place where your stock physically sits. PMP uses this as the target whenever it updates Shopify with new counts.
Step 5: Sync Products and Orders
With your location set, run two more syncs:
- Products Sync — pulls your Shopify product catalog into PMP at the variant level (titles, SKUs, barcodes, status)
- Orders Sync — pulls in recent Shopify orders, then bridges them into PMP's internal order system for picking and fulfillment
After the first run, both syncs track their bookmark and only pull what's changed.
Step 6: You're Connected

Your Shopify connection page shows the same kind of status overview as eBay: connection health, push location selection, and sync controls. An onboarding checklist guides you through the remaining steps — creating PMP items from your Shopify catalog, seeding initial stock levels, and pushing your first quantity update.
How SKU Matching Works
PMP connects your marketplace listings to your internal inventory using SKUs. When a listing's SKU matches an item's SKU in PMP, they're linked — and quantity changes in PMP flow out to that listing automatically.
For Shopify, SKUs are already part of your product data. PMP reads them directly during product sync.
For eBay, SKUs are optional on listings. If some of your eBay listings don't have SKUs assigned, PMP can generate them for you. The Ensure Listing SKU job assigns a unique identifier to each listing that's missing one, then pushes it back to eBay. Once that's done, the listing is ready for quantity sync.
The key point: PMP never guesses at matches. SKUs must match exactly (after trimming spaces and converting to uppercase). If a listing SKU doesn't match any item in PMP, it won't push quantities to that listing — and PMP will tell you which ones need attention.
What Happens After Setup
Once your marketplace connections are live, the daily workflow changes:
- Orders arrive automatically. No more checking eBay or Shopify dashboards for new sales — they show up in PMP's order queue, ready for picking. (For a deeper look at what happens from that point forward, see our walkthrough on the full order lifecycle.)
- Quantities push automatically. When you add stock, fulfill an order, or make an adjustment, PMP updates your marketplace listings. The window where you could oversell shrinks from hours to minutes.
- Your activity record tracks everything. Every sync, every push, every order import gets logged with timestamps. If you ever need to know when something synced or what changed, it's all there.
You can still run syncs manually anytime — the buttons are always available on the dashboard. But the goal is to not have to think about it. Connect once, and the automation engine handles the rest.
Running Both Marketplaces at Once
If you sell on both eBay and Shopify, PMP manages both connections against the same internal inventory. Sell a part on eBay and the Shopify quantity updates. Receive new stock into PMP and both marketplaces reflect it.
This is where the ledger-based inventory system earns its keep. Every movement — whether triggered by an eBay order, a Shopify sale, a manual adjustment, or a CSV import — gets recorded in the same permanent ledger. Your marketplace quantities are always derived from that single source of truth.
No more reconciling two dashboards against a spreadsheet. One inventory, one ledger, two storefronts.
Next Steps
If you're running both marketplaces, you'll want to understand how PMP prevents overselling when two buyers purchase the same part at the same time. That's the reservation system — and we'll cover it in a future walkthrough.
→ See how the full system fits together: Product Overview
→ Have a question about connecting your accounts? Let's talk
Written by the PMP team. We build the software and write the guides — so the walkthroughs match what you'll actually see.